Posts Tagged ‘sysadmin’

Transferring files between servers (without root)

Wednesday, January 3rd, 2024

I needed to transfer files between an old server and its replacement. rsync over ssh is the obvious tool to use but working out how to use it properly such that all file permissions are preserved under the restriction that it is not possible to ssh as root, and so sudo is required on both ends. Additionally rsync cannot be used to transfer files between two remote hosts, one end needs to be local to rsync. There is a further complication caused by the fact that we cannot type in the sudo password required by the sudo on the remote host end on the command line as rsync is already using that pipe for its own stuff so we need some X-forwarding to give us an independent channel for that and ssh-askpass to make use of it. The most useful advice came from a 2015 blog from dg12158 at Bristol but I had to add a few things for my use case.

## Preparation
# On source host
sudo apt install rsync # If not already installed

# On destination host
sudo apt install ssh-askpass rsync # If not already installed

## Transfer
# On local host
ssh -AX admin-user@source.host.example.com # To get to source host with ssh-agent and X forwarding
sudo --preserve-env=SSH_AUTH_SOCK rsync --delete --relative --acls --xattrs --atimes --crtimes --hard-links -ave 'ssh -X' --rsync-path='SUDO_ASKPASS=/usr/bin/ssh-askpass sudo -A rsync' /home/./user1/Maildir /home/./user2/Maildir /home/./user3/Maildir /home/./user4/ admin-user@destination.host.example.com:/home/
# --preserve-env so that the ssh-agent forwarding works inside sudo (using ssh agent forwarding is a security risk if source.host is compromised during the transfer)
# --delete because I expect to run this multiple times while making sure destination.host is ready before flipping over to the new host, and so also need to carry over file deletions
# --relative because I am copying directories from several different user accounts. The "/./" in the path truncates the relative path at that dot so that it all ends up in the right place in /home/ later.
# --acls --xattrs --atimes --crtimes --hard-links to make rsync be even more archivey than -a makes it
# -v for verbosity during testing
# -e to pass -X to the inner ssh used by rsync to continue the X-forwarding on to destination.host
# --rsync-path sets the SUDO_ASKPASS so that all that X-forwarding can be put to use, specifies sudo be used, and with -A so that ssh-askpass is used to ask for the password.
# Then the source folders to send over (using /./ as mentioned earlier, to avoid an extra cd command)
# Finally the destination host details and directory

What I decided against was echoing passwords around or putting them in environment variables (risk of them being logged or ending up in bash histories, and using sudo -v in advance (because that requires editing the sudo config into a less secure state not using tty_tickets).

Hopefully that will come in useful to someone else, if not, then probably future me.
Raspberry Pi Entropy server

Thursday, August 23rd, 2012

The Raspberry Pi project is one of the more popular projects the Computer Lab is involved with at the moment and all the incoming freshers are getting one.

One of the things I have been working on as a Research Assistant in the Digital Technology Group is on improving the infrastructure we use for research and my current efforts include using puppet to automate the configuration of our servers.

We have a number of servers which are VMs and hence can be a little short of entropy. One solution to having a shortage of entropy is an ‘entropy key‘ which is a little USB device which uses reverse biased diodes to generate randomness and has a little ARM chip (ARM is something the CL is rather proud of) which does a pile of crypto and analysis to ensure that it is good randomness. As has been done before (with pretty graphs) this can then be fed to VMs providing them with the randomness they want.

My solution to the need for some physical hardware to host the entropy key was a Raspberry Pi because I don’t need very much compute power and dedicated hardware means that it is less likely to get randomly reinstalled. A rPi can be thought of as the hardware equivalent of a small VM.

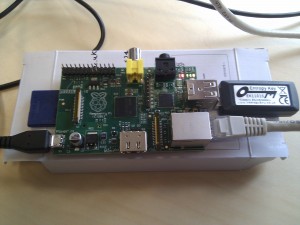
Unboxed Raspberry Pi with entropy key

I got the rPi from Rob Mullins by taking a short walk down the corridor on the condition that there be photos. One of the interesting things about using rPis for servers is that the cost of the hardware is negligible in comparison with the cost of connecting that hardware to the network and configuring it.

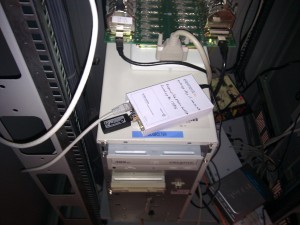
The Raspberry Pi with entropy key temporarily installed in a wiring closet

The rPi is now happily serving entropy to various VMs from the back of a shelf in one of the racks in a server room (not the one shown, we had to move it elsewhere).

Initially it was serving entropy in the clear via the EGD protocol over TCP. Clearly this is rather bad as observable entropy doesn’t really gain you anything (and might lose you everything). Hence it was necessary to use crypto to protect the transport from the rPi to the VMs.
This is managed by the dtg::entropy, dtg::entropy::host and dtg::entropy::client classes which generate the relevant config for egd-linux and stunnel.

This generates an egd-client.conf which looks like this:

; This stunnel config is managed by Puppet.

sslVersion = TLSv1
client = yes

setuid = egd-client
setgid = egd-client
pid = /egd-client.pid
chroot = /var/lib/stunnel4/egd-client

socket = l:TCP_NODELAY=1
socket = r:TCP_NODELAY=1
TIMEOUTclose = 0

debug = 0
output = /egd-client.log

verify = 3

CAfile = /usr/local/share/ssl/cafile

[egd-client]
accept = 7777
connect = entropy.dtg.cl.cam.ac.uk:7776

And a host config like:

; This stunnel config is managed by Puppet.

sslVersion = TLSv1

setuid = egd-host
setgid = egd-host
pid = /egd-host.pid
chroot = /var/lib/stunnel4/egd-host

socket = l:TCP_NODELAY=1
socket = r:TCP_NODELAY=1
TIMEOUTclose = 0

debug = 0
output = /egd-host.log

cert = /root/puppet/ssl/stunnel.pem
key = /root/puppet/ssl/stunnel.pem
CAfile = /usr/local/share/ssl/cafile

[egd-host]
accept = 7776
connect = 777
cert = /root/puppet/ssl/stunnel.pem
key = /root/puppet/ssl/stunnel.pem
CAfile = /usr/local/share/ssl/cafile

Getting that right was somewhat tedious due to defaults not working well together.
openssl s_client -connect entropy.dtg.cl.cam.ac.uk:7776
and a python egd client were useful for debugging. In the version of debian in rasperian the stunnel binary points to an stunnel3 compatibility script around the actual stunnel4 binary which resulted in much confusion when trying to run stunnel manually.