Raspberry Pi Entropy server
Thursday, August 23rd, 2012The Raspberry Pi project is one of the more popular projects the Computer Lab is involved with at the moment and all the incoming freshers are getting one.
One of the things I have been working on as a Research Assistant in the Digital Technology Group is on improving the infrastructure we use for research and my current efforts include using puppet to automate the configuration of our servers.
We have a number of servers which are VMs and hence can be a little short of entropy. One solution to having a shortage of entropy is an ‘entropy key‘ which is a little USB device which uses reverse biased diodes to generate randomness and has a little ARM chip (ARM is something the CL is rather proud of) which does a pile of crypto and analysis to ensure that it is good randomness. As has been done before (with pretty graphs) this can then be fed to VMs providing them with the randomness they want.
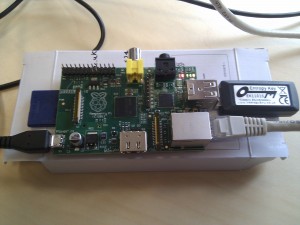
My solution to the need for some physical hardware to host the entropy key was a Raspberry Pi because I don’t need very much compute power and dedicated hardware means that it is less likely to get randomly reinstalled. A rPi can be thought of as the hardware equivalent of a small VM.
I got the rPi from Rob Mullins by taking a short walk down the corridor on the condition that there be photos. One of the interesting things about using rPis for servers is that the cost of the hardware is negligible in comparison with the cost of connecting that hardware to the network and configuring it.
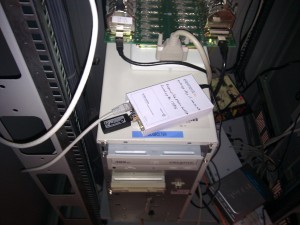
The rPi is now happily serving entropy to various VMs from the back of a shelf in one of the racks in a server room (not the one shown, we had to move it elsewhere).
Initially it was serving entropy in the clear via the EGD protocol over TCP. Clearly this is rather bad as observable entropy doesn’t really gain you anything (and might lose you everything). Hence it was necessary to use crypto to protect the transport from the rPi to the VMs.
This is managed by the dtg::entropy, dtg::entropy::host and dtg::entropy::client classes which generate the relevant config for egd-linux and stunnel.
This generates an egd-client.conf which looks like this:
; This stunnel config is managed by Puppet.
sslVersion = TLSv1
client = yes
setuid = egd-client
setgid = egd-client
pid = /egd-client.pid
chroot = /var/lib/stunnel4/egd-client
socket = l:TCP_NODELAY=1
socket = r:TCP_NODELAY=1
TIMEOUTclose = 0
debug = 0
output = /egd-client.log
verify = 3
CAfile = /usr/local/share/ssl/cafile
[egd-client]
accept = 7777
connect = entropy.dtg.cl.cam.ac.uk:7776
And a host config like:
; This stunnel config is managed by Puppet.
sslVersion = TLSv1
setuid = egd-host
setgid = egd-host
pid = /egd-host.pid
chroot = /var/lib/stunnel4/egd-host
socket = l:TCP_NODELAY=1
socket = r:TCP_NODELAY=1
TIMEOUTclose = 0
debug = 0
output = /egd-host.log
cert = /root/puppet/ssl/stunnel.pem
key = /root/puppet/ssl/stunnel.pem
CAfile = /usr/local/share/ssl/cafile
[egd-host]
accept = 7776
connect = 777
cert = /root/puppet/ssl/stunnel.pem
key = /root/puppet/ssl/stunnel.pem
CAfile = /usr/local/share/ssl/cafile
Getting that right was somewhat tedious due to defaults not working well together.
openssl s_client -connect entropy.dtg.cl.cam.ac.uk:7776
and a python egd client were useful for debugging. In the version of debian in rasperian the stunnel binary points to an stunnel3 compatibility script around the actual stunnel4 binary which resulted in much confusion when trying to run stunnel manually.

